Health and Safety:
1. Coats and bags need to be stored safely under benches or booths so no one can trip over them
2. Wash hands throughly with soap if chemical splashes. If in eye throughly wash it out with cold water.
3. No food and drink in the dark room
4. Light can cause headaches after a period of time being in the dark room so take regular breaks.
Creative Stages:
Step 1
Gather your different materials which are solid or thin which would show up differently on your photogram. As the solid materials turn white whereas the thin materials turn out grey.
Step 2
Now place your materials on to the photograph paper in a effective way showing you have planned the composition of your photogram.
Step 3
THE MACHINE has three filters which are called Cyan, Magenta and yellow. These all have to be set to zero as well as this you set the opening of the lense at f/8 which adjusts the light coming through which exposes the paper.
Step 4
You would have been asked to do a test strip which would take 3 seconds for the machine to expose the paper with the materials on. Then you take it to the developer where it would take it 2 minutes to develop but as well you have to agitate it. Eventually you will see it turn black whereas the thin materials go grey


Man Ray
"A camera alone does not make a picture. To make a picture you need a camera, a photographer and above all a subject. It is the subject that determines the interest of the photograph."
Man Ray was born on August 27th in 1890 in Philadelphia, PA. He grew up in New York, where he studied art at the National Academy of Design and the Ferrer School.
He is perhaps most remembered for his photographs, in particular the camera-less pictures he called 'Rayographs', but he always regarded himself first and foremost as a painter.
In 1922, Man Ray invented a new method of creating a photograph, which he called ‘Rayograph.’ Instead of producing photographs from a negative, Ray created photographic images by placing objects directly on photosensitive paper.


Moholy Nagy
"The reality of our century is technology: the invention, construction and maintenance of machines. To be a user of machines is to be of the spirit of this century. Machines have replaced the transcendental spiritualism of past eras."
Moholy Nagy was a Hungarian painter and photographer as well as professor in the Bauhaus school.
Moholy Nagy and his wife Lucia ( known to be a photographer) experimented with "photograms" (camera-less photographs in which light-sensitive paper is exposed directly to light), which allowed Moholy-Nagy to explore light and shade, transparency, and form.


Health and Safety:
1. Do not plug into the mains with the plastic cap on the light
2. On the accessories make sure the coil hasn't broken this will cause the light not to work
3. Make sure the light isn't exposed meaning you should always have an accessory on it
4. Do not touch the bulb as it can only take a few minutes to reach its maximum temperature.
Equipment:
Flash Head/Unit:
Snoot: this accessory is mainly used for portraiture. It is also used for low key lighting. Which is usually on a dark background so the light focuses on the person/object. For example: As you can see the light is o the left hand side whereas the right side is darker.

Soft Box:
A soft box is most popular for it's soft, even light. A soft box can make an outline of a shadow so much softer.

Reflective Umbrella:
Reflective umbrella allows you to bounce light directly onto your object making the photo clear and visible. you can get a few different coloured umbrellas gold ,silver, black and white. Gold gave the photo warmth whereas the silver reflected the light onto the object making it brighter. In contrast Black umbrellas take in the excess light and white is used to bounce light into the shadows without affecting the final outcome.

Snoot:
A snoot fits onto the front of a studio light.
It is used to create a very tight focused beam of light. It comes out really intense on a certain part of the object or person. As it creates a tight light beam its because its a conical shape as no light can escape from the side so it comes out of the little hole at the end.

Reflective Hood
This is fits onto the front of the studio light. Using reflective objects captures a unique images this makes the object lighter as the light bounces off the hood. This works really well with abstract images but can be used in portraiture as we could lighted up some of his/hers features.
Barn Doors
Just like the snoot it fits on to the front of the studio light and also its a light modifier.
Barn doors have the same purpose as a Snoot, but it allows the light to be shaped differently as opposed to the circlular pattern of the snoot. You can make the light source as big or as small as you want effecting the amount of light coming through to the object.
Light Stand
Light stands are used so the photographer can get a precise picture using the right about of light onto the object and making the sure the light hits the right heights and places.
Diffusive Umbrella
Is used just like a soft box first they are both white however for a quick shot it would b better to use the diffusive umbrella it does the same job. It creates softer outlines.
Reflectors
There are a few different coloured reflectors. There are gold, silver, white and black which all great a different light. If there is hardly any light you would have to use the silver one as the light bounces onto it to go onto the object or person. Whereas the gold is used to warm up the image. Also just like the soft box the white reflector is used to soften outlines and areas in your photo. Finally the black reflector. If there is too much light we would use the black "absorber" because it absorbs light reducing the amount of light in your photo.
Trigger and Receiver
These are used to fire a flash wirelessly. These are helpful so no shadows from us are made into the photo as we don't have to be close to the object.
Light Meter
This is used just before the photo because we want to know the amount of light coming from the light because if there is too much there will be a lot of exposure in are photo if there is hardly any it will be dark and you wont be able to see what the object is. So before we take a photo we have to see how high the light exposure is and if it is ok you can take your photo.

Aperture is one of three main things to take a great photograph. The other two being ISO and Shutter Speed. Aperture can be used to add dimension to your photograph by blurring the background or make all of the image look crisp and clear making the whole shot in focus.
ISO contributes to making your photo look good. ISO is the level of sensitivity of your camera. The higher ISO number the higher the sensitivity in your camera whereas the lower the ISO number, the less sensitive it is to the light.
The third part is the shutter speed. Shutter Speed/Exposure time is the length of time a camera shutter is open when taking a photograph.
The difference between large depth of field and shallow depth of field is that large keeps the background in focus as well as the rest of the image whereas shallow depth of field makes the background blurry making the focus point stand out more.
Aperture Priority: Is a mode on your DSLR where you can choose the aperture and the camera sets the appropriate shutter speed to go with it. On your camera aperture priority is represented by the symbol A or AV on the top of your camera. Photographers use aperture priority mode is to have control over the depth of field in a photo.
These are my photos which all have different apertures and focal points. The focal points are clearly shown as the crisp and clear where as the picture around the focal point is soft and Blurred.
For these photos I used a Nikon D40.

As you can see The focal point is on the left of the image as the blue cars are very clear and crisp. In contrast the benches are very blurry and soft as well as the cars on the right.

Overall I think this image is quite blurry and I'm not too keen on it. Personally I think the focal point is on the lamp post on the far right as compared to the rest of the image its is clearer and more crisp compared to the cars in the background.

I quite like how this has turned out as you can see the depth in this picture as I think the focal point is on the first line of cars as they are crisp compared to the cars in the background and buildings as they are softer.
The focal point is on the sky because the clouds look so sharp and crisp compared to the cars in the second row as they look so blurry you can't actually see the lights and the small details on the car.

Low Key lighting has Dramatic lighting can be done by using strong directional light from one side of the subject, causing deep shadow areas. As you can see that the light is coming through the left and you can see harsh shadows to the right.
.JPG)
Here is my first image of Low Key lighting. I used a variety of objects with different textures some rough and some smooth. For all of these images we used a shutter speed of 1/60 and a ISO of 400. In each image there is a different f number. This image has an f number of f/11 because as you can see most of the image is crisp and sharp but there is still a bit of soft especially in the bottom right.

ISO: 400
Shutter Speed: 1/60
f/8
Due to the pine cone in the middle looking a lot softer than the last image. Its not as clear and crisp.

ISO:400
Shutter Speed:1/60

ISO: 400
Shutter Speed: 1/60
f/16
Still crisp especially in the bottom of the pinecone compared to the image above because its crisp and clear. I feel like the softer areas are on the rope on the bottom right.

ISO:400
Shutter Speed: 1/60
f/22
Due to the image looking very crisp and sharp. This image seems to be a lot lighter compared to the other images as we turned the light up just like the f number.Close up/ Macro
*100 ISO
*We used a DSLR- D300 and a 50mm lens
Light Table
For these we used a plain white table with two lights shining onto the object we chose in this case I used a leaf, shell and a Broche. For these photos we needed a 50mm lens and 32mm Extension Tube and another 12mm Extension Tube which both had a soft box.
An extension tube is fitted into the camera between the camera and the lens to shorten the space between the camera and the object making a close up shot of the object. Showing the objects detailing, shadows and highlights.
The Camera had an aperture of f/11 whereas the light it self had an aperture of f/22. Also to focus the camera we used the lazy eight also known as infinity symbol. As shown in the image below you can see the symbol on the left. This was used so it could focus on the object really close.

 My first image is of a leaf. It is sharp and crisp in the front whereas behind the sharp crisp edges is a soft blurry area which make the sharp areas stand out. What I like about this is that you can see tiny lines on the leaf. Shows so much detail!. Perhaps it would have looked better on the black table.
 Personally I'm not keen on how this has turned for a couple of reasons. First of all the main part isn't in focus and that is the centre of the shell which also has the most detail on it. I also think it would have looked better on the black table as the object itself is white with brown markings.
This is my photo of a broche. I don't think this is the best one but in some ways it looks good as the softness of the crystals show tints of yellow and blue. I like how the focus isn't central. You can tell that the focus is on the top left as it is crisp and sharp. In contrast in the bottom right you can not see the crystals as it is so soft.
Black Table
For these we used a 50 mm lens and a 32 mm extension.

As you can see my object I used is a butterfly which has splashes of red on the wings. I wanted to focus on the body to show it individual hairs clearly. As well as this I wanted to focus on the facial features as the naked eye cant see them. What I like about this is that the body of the butterfly is so clear and sharp yet the wings eventually go soft and blurry. Its like when does the wing end because there are no clear lines.

Again here's the butterfly yet the focus is different as well as the position. What I like about this is you can clearly see the individual lines in the wing. The body isn't in focus but you can roughly see it. Perhaps when I edit these two images I could emphasize the red to make stand out even more against the Black background and wings.
 This image is very dark which I like as you can clearly see the darker areas inside this object. The focus point is to left as you can see the individual lines clearly in the holes. The softer area is the bottom left as it is blurry. Perhaps I should have focused on a smaller bit or captured more of the object.
 I quite like this as you can clearly see the light and dark tones as well as this you can see the detail in this. Although there isn't that much soft areas as it seems 3/4 of the coin is sharp and clear and the top left is soft and blurry. When I photo shop it I should exaggerate the shadows making it really dark and increase the amount of highlights making the detail on the coin stand out even more.
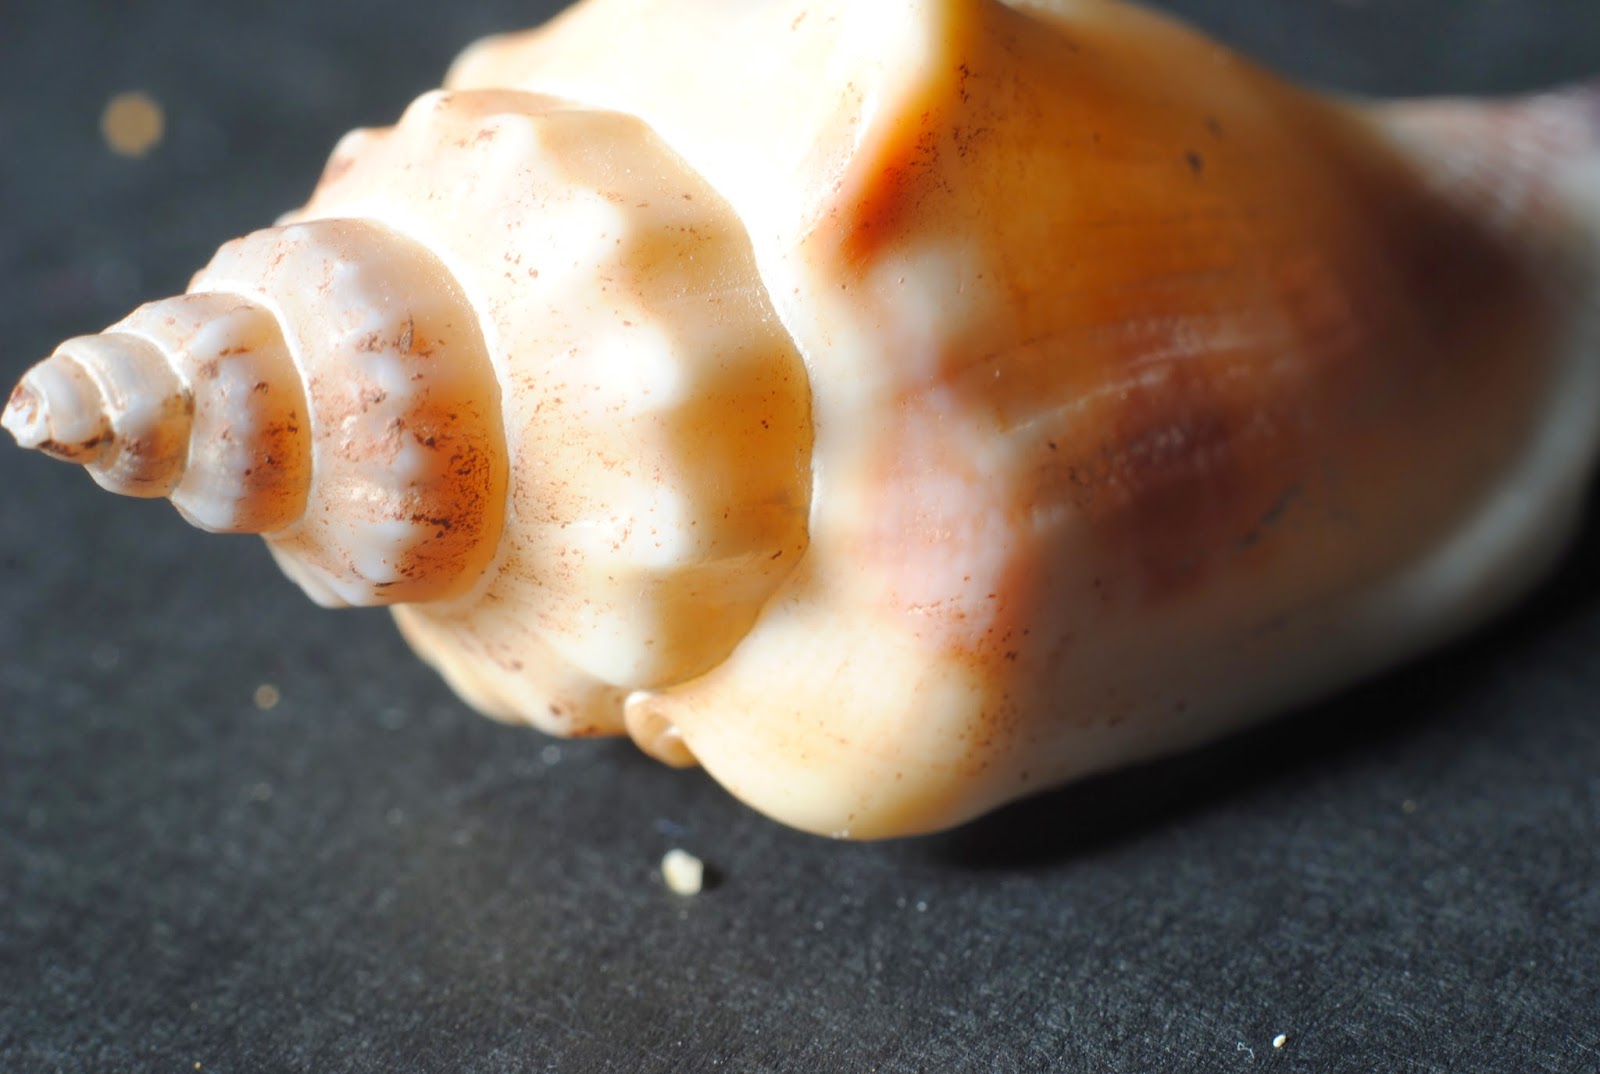 What I don't like about this is the that the shell isn't central I know they don't have to be central but I feel like it would look better and more professional. Other than that I like it as it is focused on the main part of the shell (spiral) and then blurs out to the right making it look soft. I also think the white shell looks better on the black ground as you can clearly see what the object is
Photo Shopping the Images

Here I am enhancing the dark areas as you can see that there is a lot of dark tones and I'm trying to exaggerate them slightly so you can still the object. I'm also enhancing the lighter areas especially on the legs.

Here I'm enhancing the red in the wings. I'm trying to exaggerate the colour making it stand out from the black wings and body.

Here I'm increasing the amount of exposure making the lighter areas shine through from the dark background.

In this image it shows that I'm enhancing the shadows and highlighting some areas. The shadow of the butterfly I have made it jet black whereas I have highlighted the legs and bits of the wing so you can still make out the butterfly's shape.
Final Images


Half Term Project
Here is my final series for these I merged a black and white version of the photo and coloured version together to make a dark vivid picture. Before this I used levels to mute the lighter areas because I preferred these pictures to look demonic however the last picture didn't turn out as well because compared to the other it originally had more colour. There is way to much green in it for it to become demonic.


Self Portraits


 |
| This image and image below used regularly to help produce my final outcome. |


Steve Irwin inspired composite image
Steve Irwin: known for using photoshop to create a layered image using texture and a landscape. This was done in several steps in which i have tried to create my own response to his work.
To start with we had to create are own page making it 10 by 8 inches. This was just a plain white page.

Using a landscape image we then dragged it onto the blank page. Making it all equal we held the shift key down so the image doesn't look distorted. When the image was on there we had to duplicate a layer so we can edit both of them differently.


After the adjustments were done we had the merge the images down combining them. As you can see there is a vast difference between the image above and below. The darker areas in the one below are richer,darker and more prominent compared to the original black and white image.

When this is done we had to merge the layers together. The black and white image and the coloured image beneath it.
Due this happening we have to duplicate the black and white layer (1)
After this you have to select the duplicate the black and white image and invert it making it negative. IMAGE> Adjustments> invert

When invert had been applied we had to apply a layer mode changing it from normal to multiply. A layer mode is used to blend them together. We looked through all of them and choose the right one for our individual image.
With the inverted layer use the magic stick to highlight the dark areas of the sky the you get something I like to call marching ants surrounding the area you want to get rid of.
un hide the duplicated colour image by clicking on the empty box next to the layer
thumbnail image to reveal the eye symbol
After you have done this you apply a layer mode I choose overlay.
On the top layer delete the whole sky making it all white. So the layers below have a paler sky.
Then use levels to lighten the sky up on the bottom layer.
Getting you textured layer from your other tab copy and paste it into you original document. Making it go over the top of your image. You then apply your layer mode and I chose Multiply.
Move the textured layer to the right so you can adjust the levels.
Duplicate the textured layer and Flip it.
Use a layer mask to add a circle to the textured layer and coloured building layer.
Comparing my work to Steve Irwin:
I really like how mine turned out and it defiantly looks like I was influenced by his style and technique. I love the textured layer although compared to Irwin's I think its too dark and you cant completely see the whole view od the building but other than that I think it is quite similar.
Creative Advertising
Self Directed
To capture the emoticians of a victim linked to human trafficking I feel like goes with black and white photos. As well as this you can see someones emoticians through eyes making them really glossy and dark. Just like Fredrica Erra. Also I chose Tierney to model for me because she has freckles because the majority of Erra's model have freckles so she can exaggerate them annd in the black and white they look darker. I wanted to emphasise them even more so I reduced the red making the skin below her eyes darker making it klook like she has had no sleep. As well as this it made freckles stand out. However with just the Adjustments>Black&White it made the photo look very grey toned. Comparing the grey toned image to one of Erras image it looks like Erras image has more contrast between the light and dark areas. Whereas mine doesn't show much contrast at all because the majority of the image is black and grey. Therefore I had to adjust the curves/levels increasing the lighter shades so it shows contrast just like Erra.
On one of the photos I decided to do something different. Before I made the image black and white I increased the vibrance. Making the skin look very pink and the eyes very glossy blue/green. I wasn't too keen on how the skin looked because it looked too glossy like the person had a lot of life in them. However I did like the eyes in the picture because they are glossy and show her emoticons and her soul. To link with he emoticon of Tierney in the picture I wanted to make the image black and white. Perhaps for my final graphic image I could try and incorporate the glossy eyes with the dull skin on the other image. Making the whole image look sinister looking linking to the theme Human Trafficking.
Health and Safety
1. Bags under chairs
2. Put the plugs into the sockets before turning the machine on (lights etc)
3.Don't look directly into the light when it flashes (COSHH can lead to bad eye sight in the future)
4. Make sure the cables aren't in the way of doorways (trip hazards can lead to injuries COSSH)
Editing my Graphic Image
To start with I used the blemish control to remove any spots imperfections. When this was done I went to Adjustments>Black and white while it was on black and white I need to adjust the colour tones within the image. To get the same effect as Erra's work I decided to decrease the red tones the most making the skin more dull. As well as this the red decreases to make areas a lot darker. The areas I wanted darker were under eyes and any shadow making it more prominent.

Federica Erra
Known for being a photographer who
Takes portrait pictures very close to face to capture the emotions on the model. In the majority of his work he edits in black white linking with the emotions. Throughouthis work you can clearly tell what he emphasised the main area that is emphasised are the eyes as they are very glossy. As well as this the freckles are always prominent. I think this is due to adjusting the colour tones while its black and white. From doing my photographs I have learned that he decreasing the red tones making the darker areas stand out even more creating contrast.
Wes Naman
Artist known for jokey photographs. Interested in his portrait incorporating tape as I think it could link to the lack of speech and power. His portraits were produced on a drunken night seeing which friend looked the most grotesque.
Lukasz Poslad
Not very well know artist. One piece clearly inspired me because it was a girl crying with manly hand over her mouth showing dominance. I didn't neves call do his style but I really like th message behind his work. Shows the victims emotions and I think the hands represent that lack of speech and right to fight back. Which I may incorporate into my poster by maybe painting over the mouth or using tape like Wes Naman just in more of a serious manner.
No comments:
Post a Comment